Project 130: Computational Fluid Dynamics: Water with custom Shader effect


I have managed to port over one of the Water shader examples from Ati's RenderMonkey to T3d. I was right, porting over additional shaders was basically the same as porting over the simple glitter shader, once I learned how the shader constants, samplers, etc work in T3D I was able to port over the Water shader fairly easily.

I think the shader looks relatively good, although there is one issue, which I identified earlier. The texture coordinates on the metablob are not correct. I used a vastly simplified method of calculating the texture coordinates, and it has led to noticeable stretching. I don't have time to create a full Triplanar texturing solution, but I may try to improve the existing texture coordinate system by using spherical mapping later in the week.

One of the main things that makes the shader look as good as it does is a cubemap. This allows the surface of the metablob to reflect the sky above. I had never used cubemaps in shaders before, only as skyboxes, you can create some very realistic looking effects with them.

I also implemented transparency on the Material, giving the water a see-through effect, which wasn't present in the original RenderMonkey Shader.

The next step in this project is toadd all of the variables used in the configuration of the simulation (number of metaballs created, size of the simulation, speed, gravity constant, etc) to the T3D gui editory, so that the simulation can be edited in real time. To do this, I need to make some logical changes to the system, to allow for real-time updating and multiple fluid simulations to be used at the same time (A lot of the variables are either constants or globals at the moment).

I also intend to create three more Materials: Lava, Mud, and Tar, in addition to Water. I found a great example in RenderMonkey which I intend to use for the lava shader, and I believe I can use a standard Material for the Mud and Tar. I think if I use a texture with animation I can simulate flowing mud or tar quite well without having to write a custom shader.


You must be a member of this blog to see the comments. Log in now!

Project 130: Computational Fluid Dynamics: Successful RenderMonkey Shader Implementation in T3D

After much effort, I have maged to get a shader from ATI's RenderMonkey ported to T3D. I had to do extensive research and work not in porting the shader, but in suppling the correct information from the T3D material system to the Shader. I am talking about registers, samplers, view matrices, light direction vectors, etc. This was the subject of a Tutorial I created on the subject, and I will probably create some more, since I found the documentation on this subject quite lacking.

I chose RenderMonkey as a shader generation tool because unlike Nvidia's FX Composer, RenderMonkey generates a separate Vertex and Pixel shader file, something required for the T3D. This makes it much easier to port a shader than one of FxComposers .FX files (although porting FX Composer  generated shaders can be done).

The shader itself is nothing special, it is a simple "glitter" shader I found in the RenderMonkey examples directory. The effect is difficult to see on the video below, but it basically creates bright spots of of white on the mesh which twinkle as the view position changes. This simple implementation, however, should allow me to port over other shaders much more easily.

I have gone from knowing very little about shaders and T3d's material system to having quite a good grounding in it in about a week, due to the amount of effort this took to do, which I suppose means it was worth it, despite the time delay it caused.


You must be a member of this blog to see the comments. Log in now!

T3D Tutorial: Custom Materials and Shaders


I have recently been working on implementing shaders in T3D, for my fluid dynamics project. It seems that a lot of the information available on the subject is outdated, due to changes in the Torque materials system. I decided to create this tutorial to hopefully help anyone else who ran into the same issues that I did. I intend to describe how exactly to create a custom material in Torque 3D v3.0, specify a shader, pass parameters to that shader, and read them in from the shader itself.


First, the shader. I am going to use the simple "Red Shader" example which I found here: A Red Shader T3D uses HLSL for it's shaders, and requires a separate pixel and vertex shader. These shaders should be named "redShaderV.hlsl" for the vertex shader, and "redShaderP.hlsl" for the pixel shader. You can name them anything you want, but for the purposes of this tutorial, it is assumed the above names are used. The shaders should be saved to: "shaders/common/".


The vertex shader is as follows:


#define IN_HLSL #include "shdrConsts.h"

//---------------------------------------------------------------

// Constants

//---------------------------------------------------------------


struct Appdata {

float4 position : POSITION; float4 texCoord : TEXCOORD0;

};


struct Conn {

float4 HPOS : POSITION; float2 outTexCoord : TEXCOORD0;

};

//---------------------------------------------------------------

// Main

//---------------------------------------------------------------


Conn main( Appdata In, uniform float4x4 modelview : register(VC_WORLD_PROJ), uniform float4x4 texMat : register(VC_TEX_TRANS1) )

{

Conn Out;

//take vert and get coord by transforming by modelviewmatrix

Out.HPOS = mul(modelview, In.position);

//set base texture coord

Out.outTexCoord = mul(texMat, In.texCoord);

return Out;

}


and the pixel shader:


//--------------------------------------------------------------

//Structures

//--------------------------------------------------------------


struct ConnectData {

float2 texCoord : TEXCOORD0;

};

struct Fragout {

float4 col : COLOR0;

};

//--------------------------------------------------------------

//Main

//--------------------------------------------------------------

Fragout main(ConnectData IN, uniform sampler2D baseTex : register(S0) )

{

Fragout OUT;

//uses the base textures' color to set difuse color

float4 diffuseColor = tex2D( baseTex, IN.texCoord );

//use enhance the diffuse with another color, red in this case

float4 someColor = float4(1.0, 0.0, 0.0, 1.0);

OUT.col = diffuseColor * someColor;

return OUT;

}


Now, in a script file, you must create a shader definition. This is where things start to change, some resources advise creating a datablock for the shader definition, this method is no longer used. The correct way is to use a singleton, like so:


singleton ShaderData( aRedShader )

{

DXVertexShaderFile = "shaders/common/redShaderV.hlsl";

DXPixelShaderFile = "shaders/common/redShaderP.hlsl";

pixVersion = 2.0;

samplerNames[0] = "$baseTex";

};


It is very important here to note the "samplerNames[0] = "$baseTex";" line. This is needed when passing textures into the shader. Remember the beginning of the pixel shader? The line:

uniform sampler2D baseTex : register(S0)

is expecting a texture (sampler) on register" S0", which will be called baseTex. In order for this to work, you must add:

" samplerNames[0] = $baseTex";

in the shader definition. The sampler name in the definition must match the name in the shader! Otherwise the texture won't be passed properly. To pass multiple samplers, simple change the "0", for example:

samplerNames[1] = "$baseTex2";

and:

"uniform sampler2D baseTex2 : register(S1)"


Finally, to map the material to an object, a CustomMaterial must be defined. To do this, we need to first decide what object you want to map the material to. For this tutorial, I have chosen the "station" object, since it is simple, and comes with stock T3D. Navigate to:

"art/shapes/station" 

and open the file "materials.cs". Find the old material definition, and comment it out or remove it. It should start with "new Material(Structure_wall)". Add the custom material definition underneath, like so:


singleton CustomMaterial(Structure_wall)

{

mapTo = "building01walls";

sampler["baseTex"] = "art/shapes/station/building01walls";

shader = aRedShader; version = 2.0;

};


The name of the CustomMaterial must match the material name of the art file. Notice also that the "baseTex" texture sampler is being defined here. Now, all that's left is to test the CustomMaterial! Run the game, enter the world editor, and navigate to:

Library, meshes, art, shapes, station, station01.

You should see that the station is now bright red, indicating that the shader is being correctly applied. What's happening here is fairly simple. Note these lines in the pixel shader:

float4 someColor = float4(1.0, 0.0, 0.0, 1.0);

OUT.col = diffuseColor * someColor;
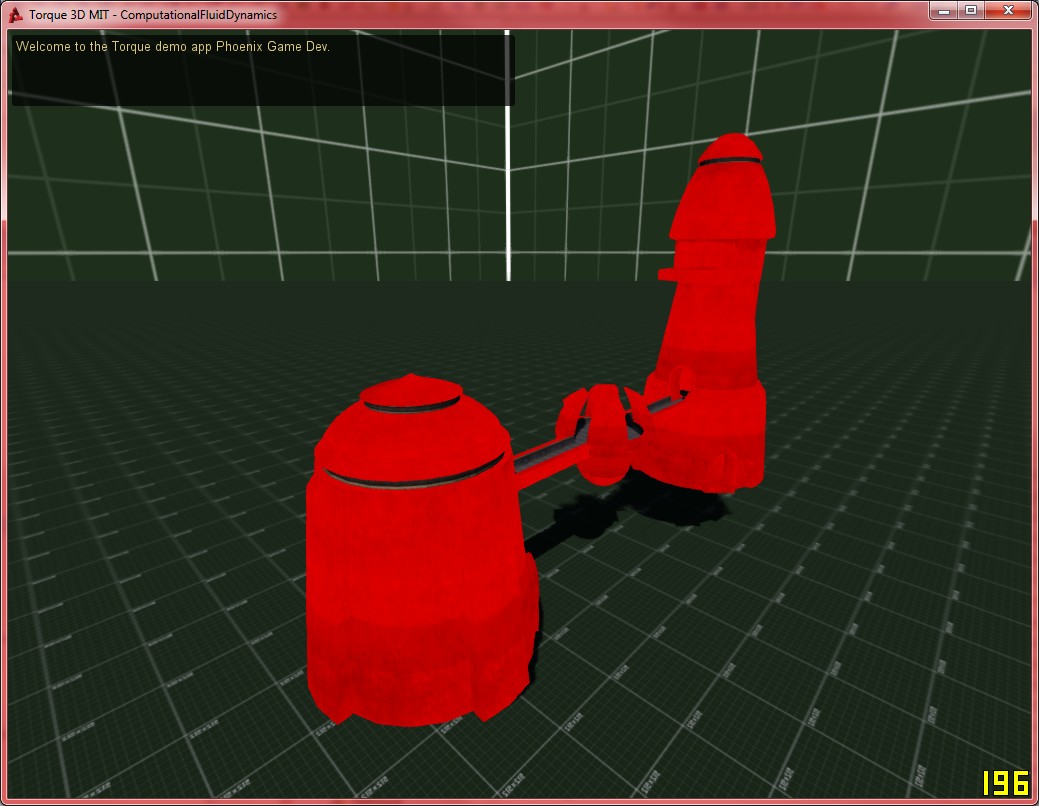
The float4 "someColor" is red. It takes the form Red, Green, Blue, Alpha, so in this case, Red is 1, green is 0, blue is 0, Alpha is 1, so a strong red colour is produced. The diffuse Color is the texture, so multiplying the two allows you to see the texture, but in bright red. You may notice that some parts of the station do not have a red shader applied. This is because these are mapped to different materials, you can mix many materials on the same object.


You must be a member of this blog to see the comments. Log in now!

Project 130: Computational Fluid Dynamics: Texturing and Basic Shading options


I have now sucessfully textured my fluid mesh. I am currently using standard T3D Materials, which do not offer custom shader support, but they do have several shaders and effects that I can use for demonstration purposes, as well as full texture support. I think the project is looking very good at this stage.

The only problem is the shortcut I took for adding the texture coordinates to the metablobs. I didn't realise that adding texture coordinated to a dynamic mesh like this is actually very complex. This is because the mesh is not flat it, and so applying a texture that looks good from one angle, may have streaks when viewed from another angle. The most preferred solution seems to be "Triplanar Texturing". This is essentially where three textures are used, and, depending on the angle of the vertex normal, the texture which will result in the least distortion at that point is chosen. I may have to implement Triplanar texturing or something like it (for example spherical mapping) eventually, but for the moment I implemented a very simple shortcut:


s = x + z;

t = y + z;


or, in code:

pVert->texCoord = Point2F(pVert->point.x+pVert->point.z,pVert->point.y+pVert->point.z);


This is a very simplistic solution, but the results are acceptable. Depending on the angle and the texture used, however, there can be noticeable stretching.


I also had to implement a primitive buffer in order to get textures working, but luckily this was not difficult.

Finally, some videos:


You must be a member of this blog to see the comments. Log in now!

Project 130: Metablobs as a fluid

Recent developments in my fluid physics project include gravity, and directional  vectors with user-specifiable magnitude. It is now, for the first time, starting to look like a fluid. Performnce is so far good, and I am very confident that I will end up with something worth releasing at the end of this. 

I still need to do some more physics code, and then add materials and shaders to the metablobs. I have also considerd adding multi-threading support to the project, and creating a seperate thread just for the fluid dynamics. Since almost all machines are multicore now, this should provide a significant performance boost for almost every user.


You must be a member of this blog to see the comments. Log in now!

<< Previous :: Next >>