I have recently been working on implementing shaders in T3D, for my fluid dynamics project. It seems that a lot of the information available on the subject is outdated, due to changes in the Torque materials system. I decided to create this tutorial to hopefully help anyone else who ran into the same issues that I did. I intend to describe how exactly to create a custom material in Torque 3D v3.0, specify a shader, pass parameters to that shader, and read them in from the shader itself.
First, the shader. I am going to use the simple "Red Shader" example which I found here: A Red Shader T3D uses HLSL for it's shaders, and requires a separate pixel and vertex shader. These shaders should be named "redShaderV.hlsl" for the vertex shader, and "redShaderP.hlsl" for the pixel shader. You can name them anything you want, but for the purposes of this tutorial, it is assumed the above names are used. The shaders should be saved to: "shaders/common/".
The vertex shader is as follows:
#define IN_HLSL #include "shdrConsts.h"
//---------------------------------------------------------------
// Constants
//---------------------------------------------------------------
struct Appdata {
float4 position : POSITION; float4 texCoord : TEXCOORD0;
};
struct Conn {
float4 HPOS : POSITION; float2 outTexCoord : TEXCOORD0;
};
//---------------------------------------------------------------
// Main
//---------------------------------------------------------------
Conn main( Appdata In, uniform float4x4 modelview : register(VC_WORLD_PROJ), uniform float4x4 texMat : register(VC_TEX_TRANS1) )
{
Conn Out;
//take vert and get coord by transforming by modelviewmatrix
Out.HPOS = mul(modelview, In.position);
//set base texture coord
Out.outTexCoord = mul(texMat, In.texCoord);
return Out;
}
and the pixel shader:
//--------------------------------------------------------------
//Structures
//--------------------------------------------------------------
struct ConnectData {
float2 texCoord : TEXCOORD0;
};
struct Fragout {
float4 col : COLOR0;
};
//--------------------------------------------------------------
//Main
//--------------------------------------------------------------
Fragout main(ConnectData IN, uniform sampler2D baseTex : register(S0) )
{
Fragout OUT;
//uses the base textures' color to set difuse color
float4 diffuseColor = tex2D( baseTex, IN.texCoord );
//use enhance the diffuse with another color, red in this case
float4 someColor = float4(1.0, 0.0, 0.0, 1.0);
OUT.col = diffuseColor * someColor;
return OUT;
}
Now, in a script file, you must create a shader definition. This is where things start to change, some resources advise creating a datablock for the shader definition, this method is no longer used. The correct way is to use a singleton, like so:
singleton ShaderData( aRedShader )
{
DXVertexShaderFile = "shaders/common/redShaderV.hlsl";
DXPixelShaderFile = "shaders/common/redShaderP.hlsl";
pixVersion = 2.0;
samplerNames[0] = "$baseTex";
};
It is very important here to note the "samplerNames[0] = "$baseTex";" line. This is needed when passing textures into the shader. Remember the beginning of the pixel shader? The line:
uniform sampler2D baseTex : register(S0)
is expecting a texture (sampler) on register" S0", which will be called baseTex. In order for this to work, you must add:
" samplerNames[0] = $baseTex";
in the shader definition. The sampler name in the definition must match the name in the shader! Otherwise the texture won't be passed properly. To pass multiple samplers, simple change the "0", for example:
samplerNames[1] = "$baseTex2";
and:
"uniform sampler2D baseTex2 : register(S1)"
Finally, to map the material to an object, a CustomMaterial must be defined. To do this, we need to first decide what object you want to map the material to. For this tutorial, I have chosen the "station" object, since it is simple, and comes with stock T3D. Navigate to:
"art/shapes/station"
and open the file "materials.cs". Find the old material definition, and comment it out or remove it. It should start with "new Material(Structure_wall)". Add the custom material definition underneath, like so:
singleton CustomMaterial(Structure_wall)
{
mapTo = "building01walls";
sampler["baseTex"] = "art/shapes/station/building01walls";
shader = aRedShader; version = 2.0;
};
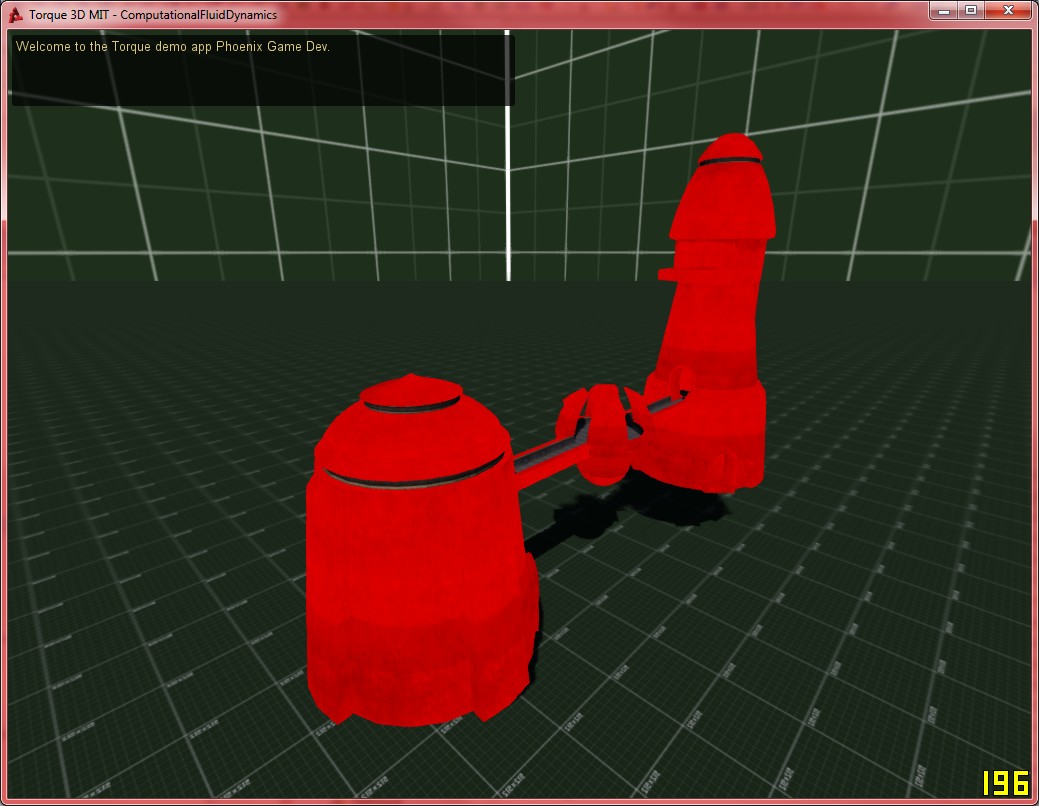
The name of the CustomMaterial must match the material name of the art file. Notice also that the "baseTex" texture sampler is being defined here. Now, all that's left is to test the CustomMaterial! Run the game, enter the world editor, and navigate to:
Library, meshes, art, shapes, station, station01.
You should see that the station is now bright red, indicating that the shader is being correctly applied. What's happening here is fairly simple. Note these lines in the pixel shader:
float4 someColor = float4(1.0, 0.0, 0.0, 1.0);
OUT.col = diffuseColor * someColor;
The float4 "someColor" is red. It takes the form Red, Green, Blue, Alpha, so in this case, Red is 1, green is 0, blue is 0, Alpha is 1, so a strong red colour is produced. The diffuse Color is the texture, so multiplying the two allows you to see the texture, but in bright red. You may notice that some parts of the station do not have a red shader applied. This is because these are mapped to different materials, you can mix many materials on the same object.